
 So you want to create a system in your WordPress site where people (possibly only those with a selected registration level on your site, but that’s a separate topic) are able to fill out a form and submit a post for publication on your site. Say you want to:
- run a photo contest and let people submit their own entries
- manage a user-submitted recipe website
- create book review site where people can submit their own opinions on what they’ve read
This is a simple-sounding function, but it seems to take a little bit of work to get it set up and working smoothly.
The benefits of using a front-end-submission system are simple, but important:
- You don’t have all kinds of people logging in to the back end of your site, which means you avoid the need to manage that carefully
- You can steer people to only one type of submission (e.g. a photo entry)
- It makes it very easy to people to send in their submissions without having to learn what the admin panel (even a limited one) looks like. All they do is fill in a form that is nicely branded with your website design, hit “submit,” and then wait for you to review and post it live for them!
Here’s how I got it all to work as intended, using the premium plugins CustomPress and Gravity Forms (efforts to go the “free” route just kept not working for me, but I might have some ideas now on how to solve that, too?):
1. Download and activate the plugins you’ll need before you start:
- Gravity Forms (paid plugin)
- Gravity Forms + Custom Post Types (free plugin)
- CustomPress (paid plugin)
Note: If you have other plugins that do some portion of these same functions, such as PODS, or Types, deactivate them. Once you get this recipe working, you might want to delete them completely.
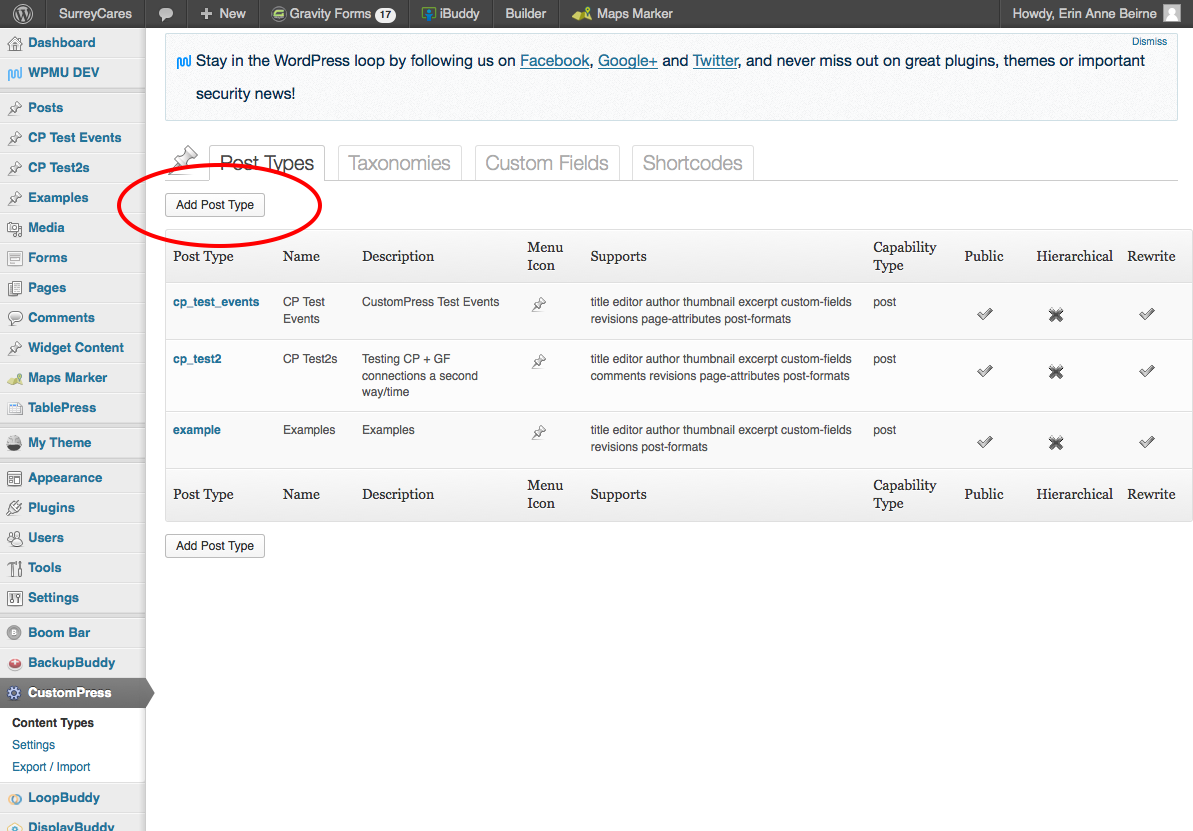
2. Open CustomPress and add a new custom post type:
- Select “Add Post Type”
- CRITICAL STEP: Post Type: Give it a system-friendly name with only lower-case letters and underscores — choose well as it can’t be changed later
- CRITICAL STEP: Supports: Make sure you select Title and Custom Fields. After that, choose what you want to be able to do with your new post type, eg add a thumbnail, allow comments, etc.
- The rest is up to you
- Save

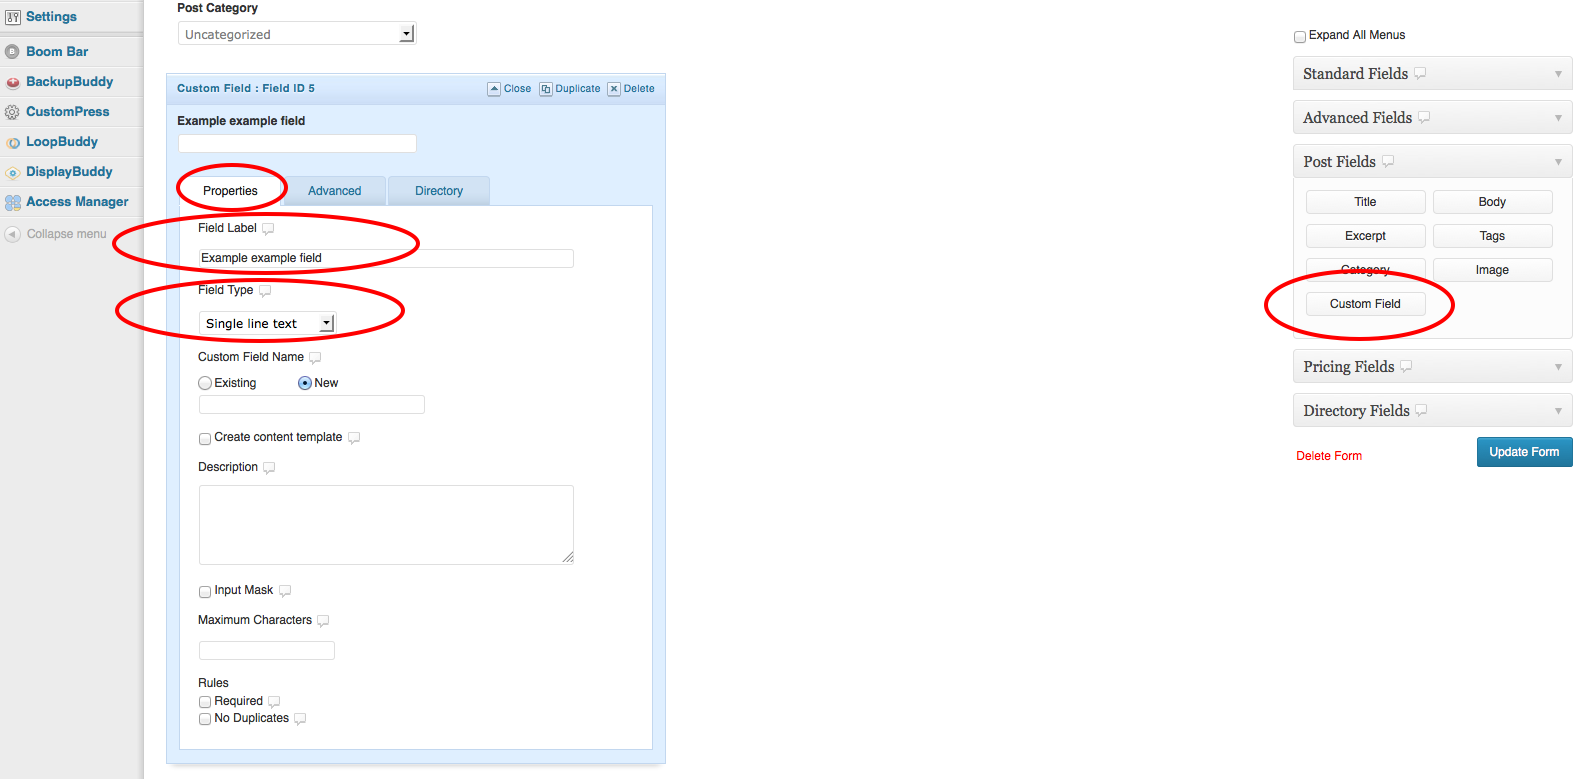
3. Now add Custom Fields:
- Click on the Tab named “Custom Fields”
- Click on “Add Custom Field”
- Make sure the names for your new custom fields are all unique and don’t replicate anything you might have created in any other plugin
- CRITICAL STEP: Always select “Allow for WP/plugins” — essential for Gravity Forms to be able to connect with your custom fields
- Choose the Post Type name that matches your new custom post type (you can choose more than one post type that this field will work with, if you want)

- Save
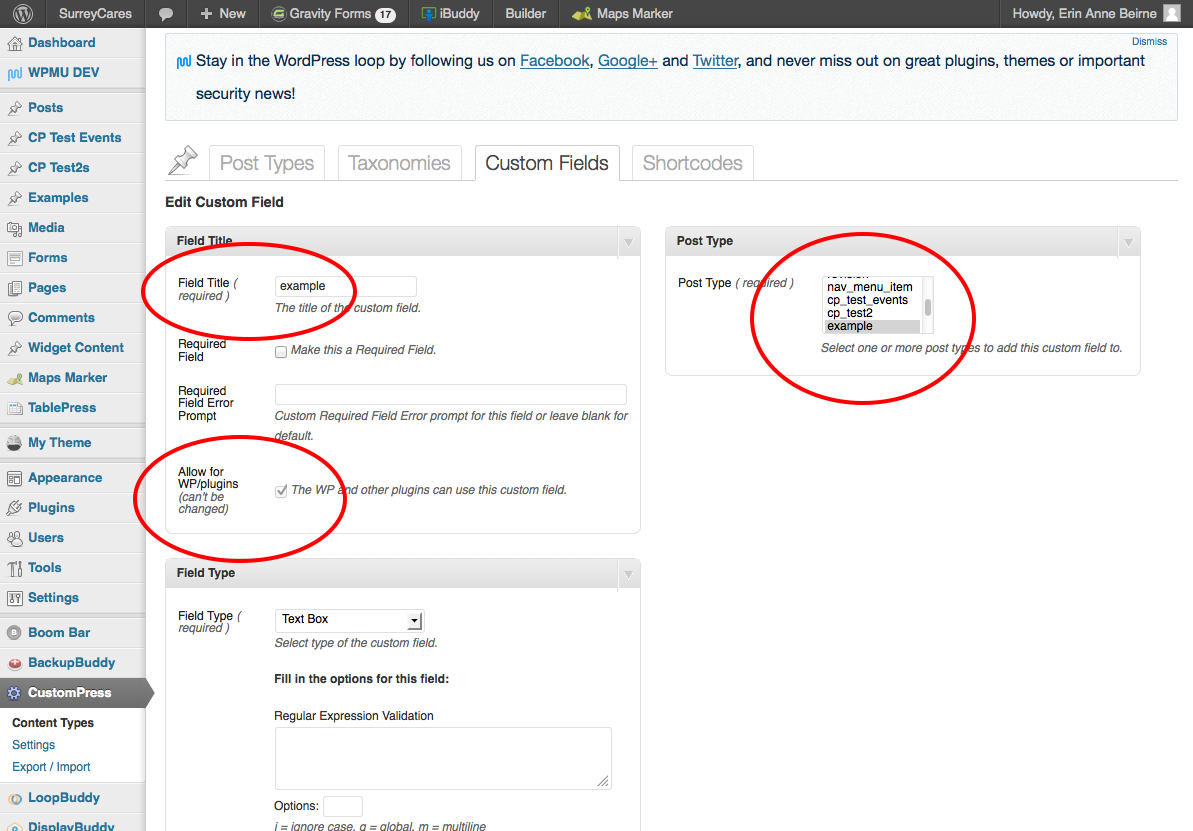
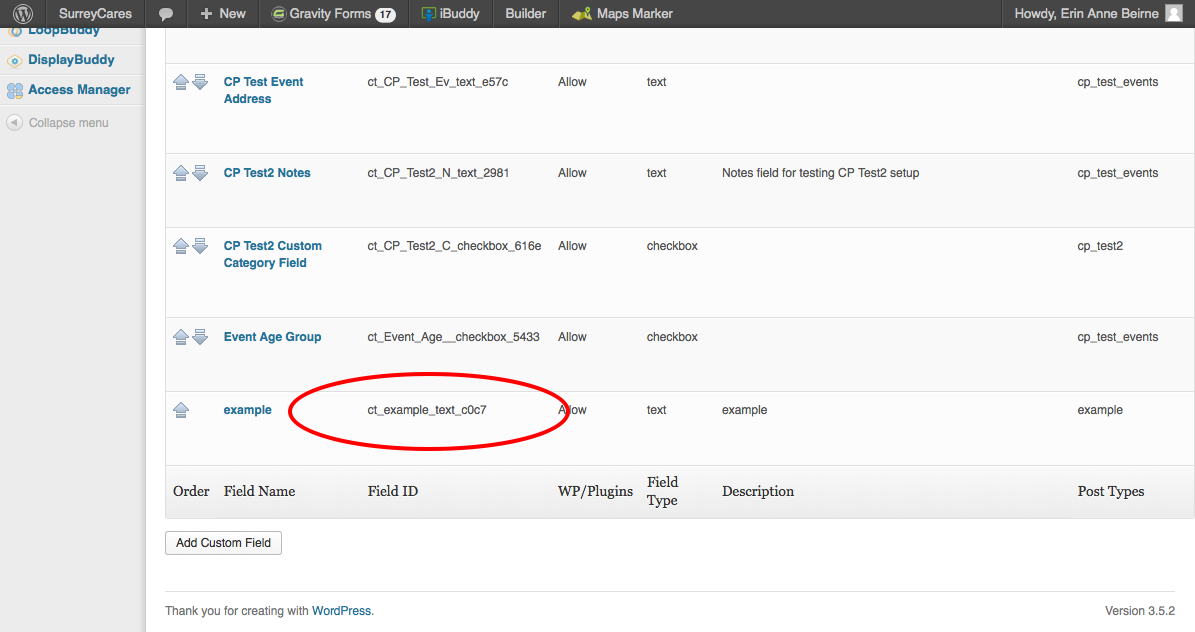
- Copy the new field’s slug (under Field ID in the main Custom Fields window)
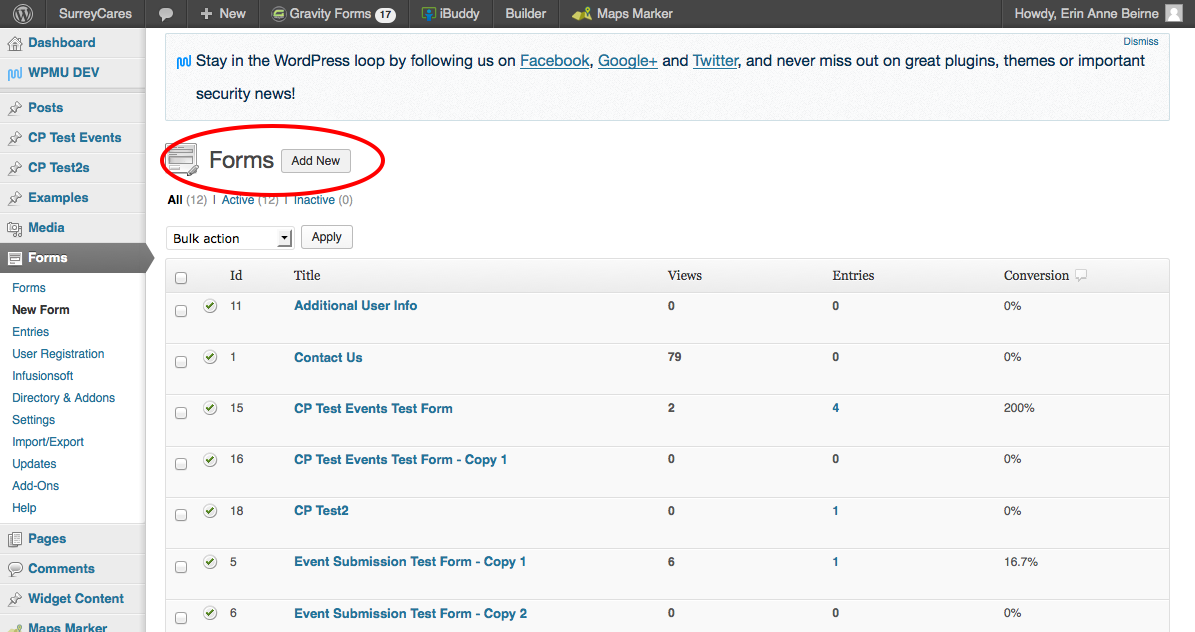
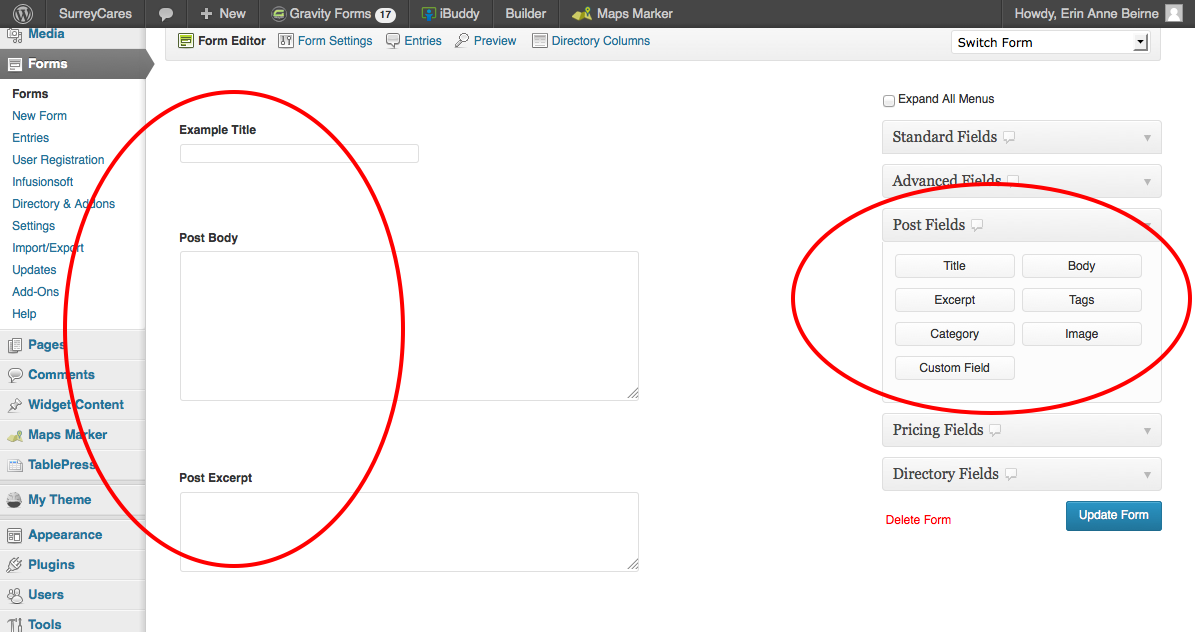
4. Create a new Gravity Form:
- Create a new form especially for your new custom post-type submission form
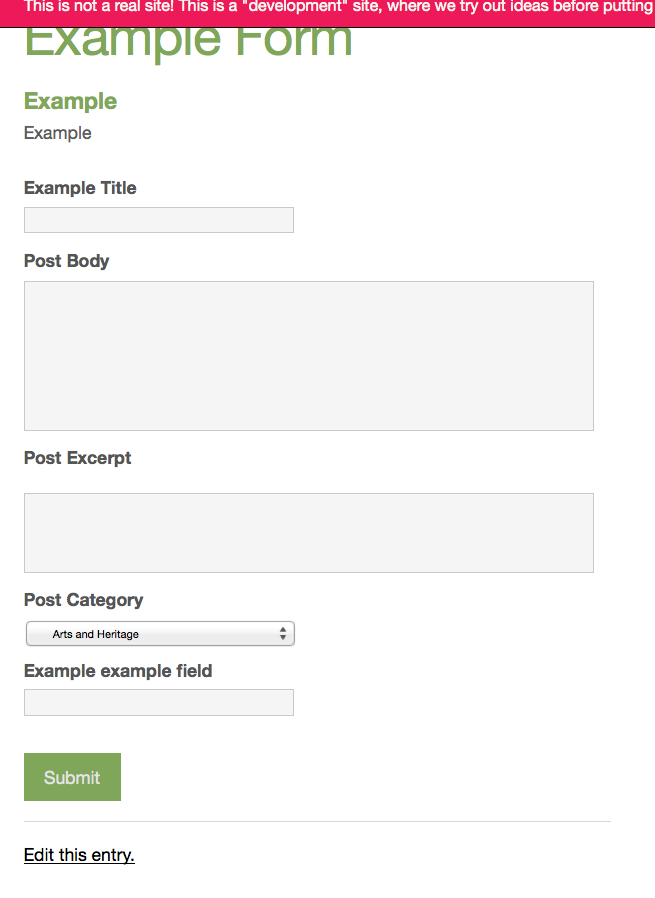
- Choose at least the first two of the following default fields from Post Fields (I use all four, and often more): Post Title; Post Body; Post Excerpt; Post Category
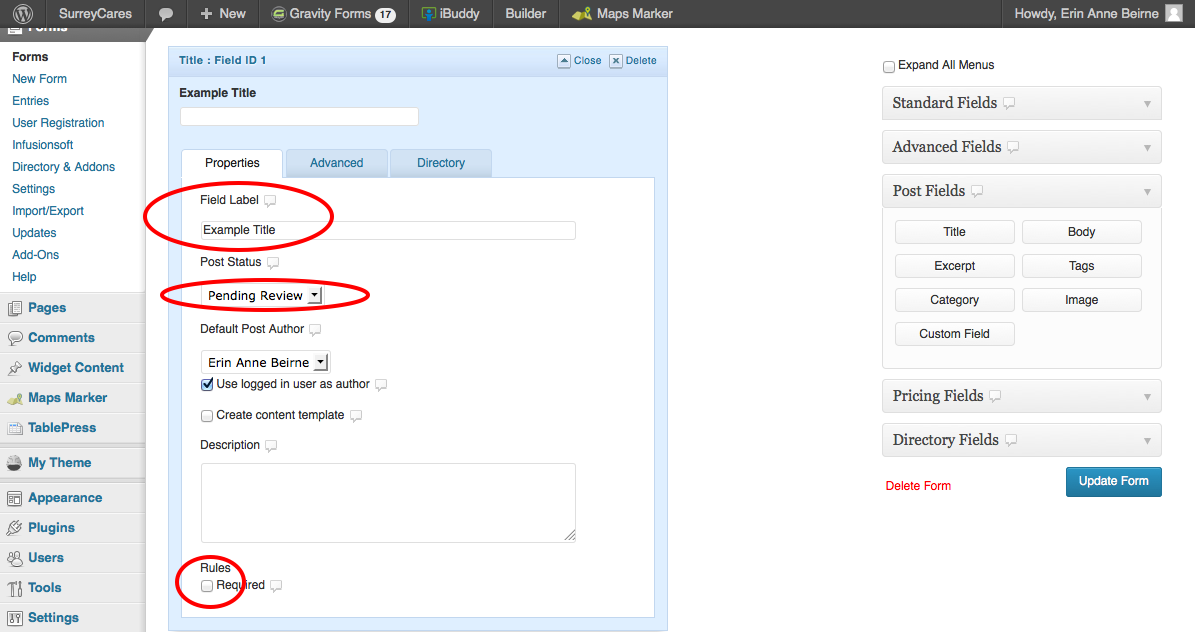
5. Edit the “Properties” details in the Post Title Gravity Form field:
- Now go back up to the newly-added Post Title form field, click on Edit, and make sure you are on the Properties Tab:
- If you want a custom name instead of just “Post Title,” change it in the Field Label box
- Set Post Status to Pending Review (I don’t want people’s submissions to publish until after I’ve viewed them, but “your mileage may vary?”)
- Decide if this box MUST be filled out or not (I’d suggest yes to ensure the post has a title and you don’t have to take the time to create one) and use the checkbox at the bottom where it says “Rules: Required”

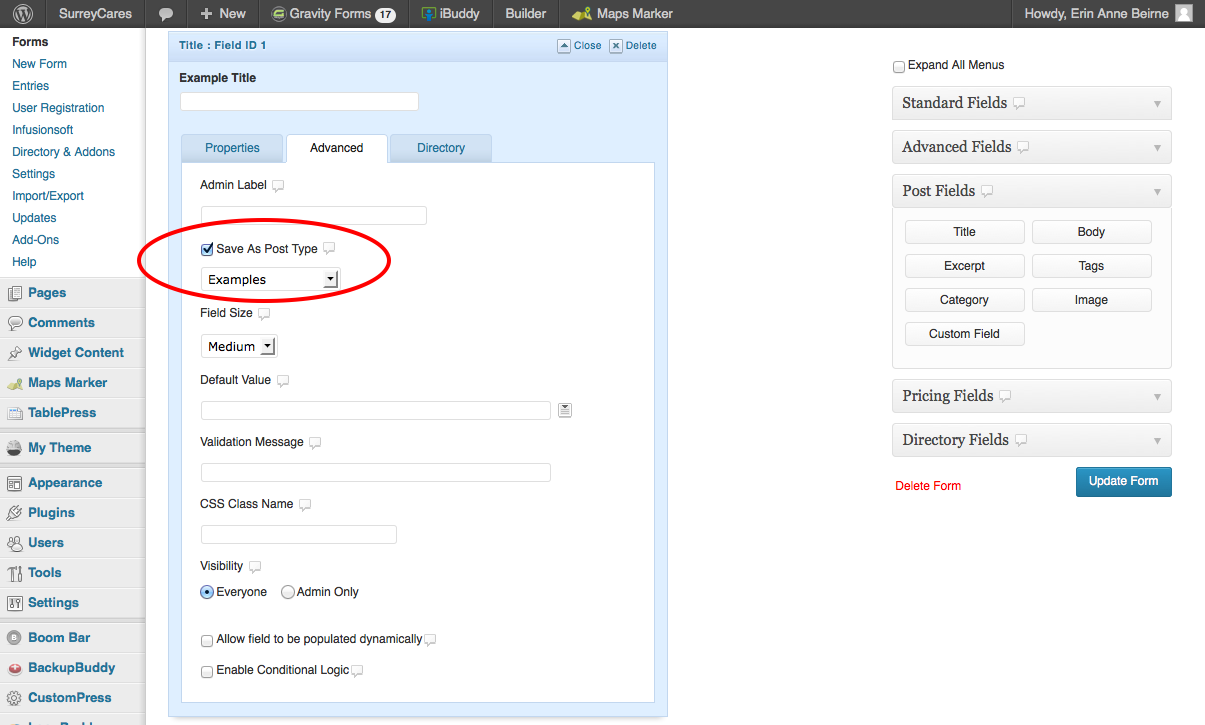
5. Edit the “Advanced” details in the Post Title Gravity Form Field:
- Click on the Advanced Tab for the Post Title field in Gravity Forms
- CRITICAL STEP: Select Save As Post Type by clicking in the checkbox, and select your new custom post type from the drop-down list
- The rest is up to you

6. Review the rest of your standard post entry fields:
- Post Body and Post Excerpts fields shouldn’t need adjusting unless you want to tweak their titles to fit your post type content
- Choose which Post Category you want this submission to belong to
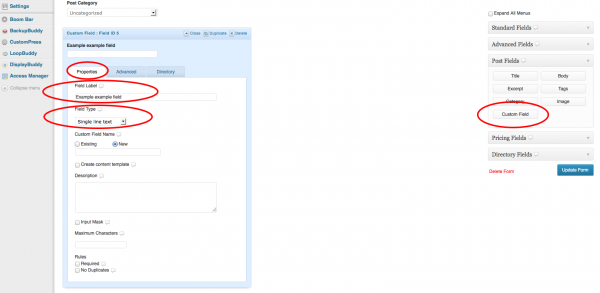
7. Add and set up your custom fields so the entry fields connect to your custom post fields:
- Click on the Custom button under Post Fields — you’ll need to add one Post Custom Field box in your Gravity Form for each new custom field you created in CustomPress that you want form users to be able to fill out
- Click to edit the new Post Custom Field box
- Give it a suitable (human-friendly) name
- Choose which type of field it is (e.g. date, text, whatever)
8. Now you need to connect the Gravity Forms entry field to the correct CustomPress Field Name:
NOTE: This step is where your new Gravity Forms field will map to your new CustomPress field, but the very first time you use the new field it probably won’t show up here under “existing” even though you’ve already made it in CustomPress! Gravity Forms won’t be able to “see” it at first. Once you’ve “helped” GF “see” it by one of the methods below, it will appear in your list in the future.
8 a. OPTION ONE (longer but possibly more reliable):
- Save your form
- Using the WP admin panel and your newly-created post type manager, add a new custom post, fill in all the fields (dummy text is fine), and publish it
- Return to your new Gravity Form and go back into the Custom field box
- Under the Properties Tab, select Custom Field Name: Existing, and your new custom field should now appear in the drop-down list
- Select the custom post Field ID for the post field you want this entry field in Gravity Forms to map to
- Update (save) your form

8 b. OPTION TWO (shorter and easier, but might be less reliable?):
- Click on the “New” radio button under Custom Field Name
- Paste the slug (Field ID) for the custom field you want to link this form entry field to in the custom post type
Save your form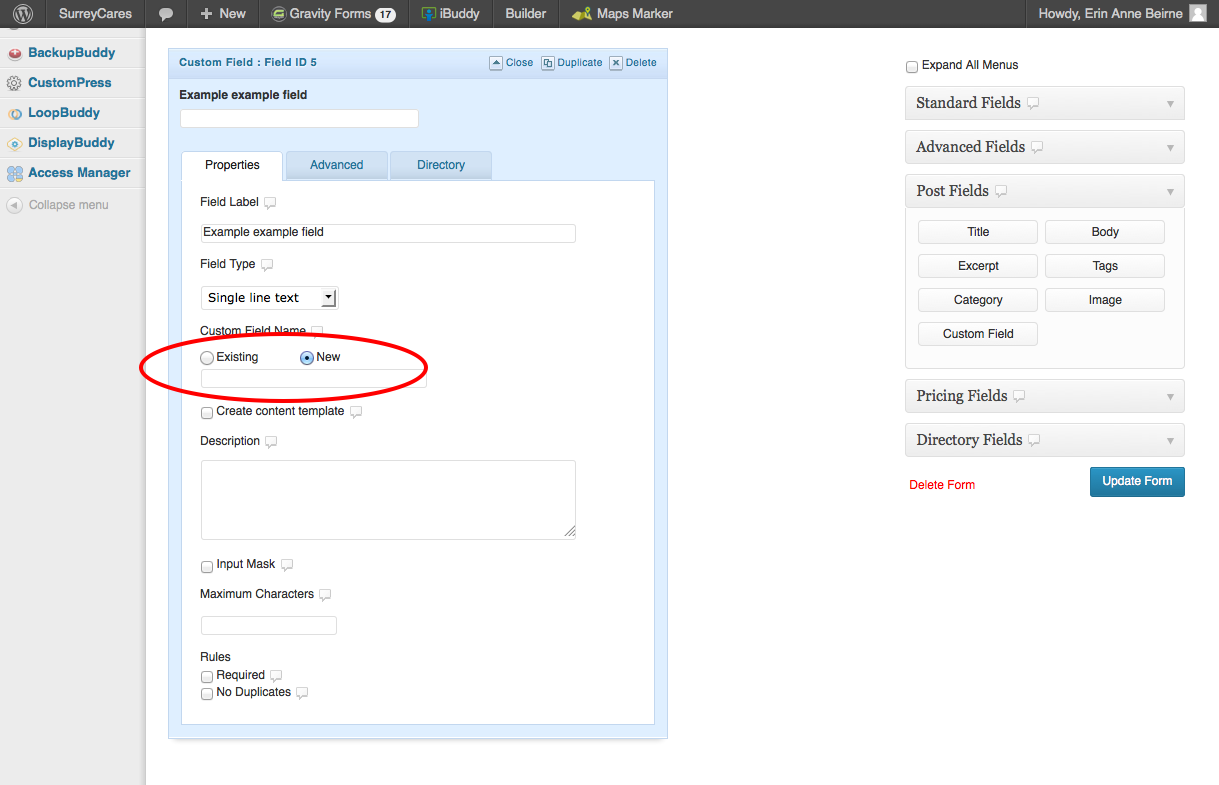
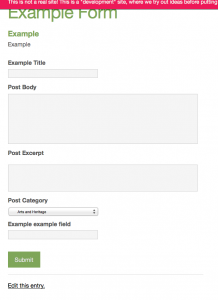
9. Test it out:
- Create a New Page
- Add the new form you’ve just created, and publish the page
- Open the page from the front end
- Fill in the form and submit it
- Go to your new Custom Post manager and look for the new Pending Post that Gravity Forms should have automatically generated from the form submission
- You should see it there in the list of posts for that post type; check that the right entry fields map to the right post fields!

10. If something is wrong, such as the new post doesn’t show up or the fields don’t match correctly, go back and check each step again, especially:
- Make sure you selected “Allow for WP/Plugins in your custom field options in CustomPress
- Make sure you selected the right post type in Save As Post Type in your Gravity Form
- Make sure you pasted the correct Field ID (with no extra spaces before or after) into the Custom Field Name information for each field in Gravity Forms
Important: Displaying your new custom post type content is a different topic!

Hi guys,
Regarding your comments above – I actually coded this very thing (not as a plugin, unfortunately).
I can create a post on my site about it if you think it’d be valuable? (assuming you code or have coders)
In summary, you firstly create a new page & template for the selection/deletion of posts, and set WP_Query to only show posts that the user has authored, by passing their user ID into the query.
You display them on the page, with a link to another new page which handles deletion.
For example, each post displayed may have a link around it like so:
A post
The you’d create another page (delete-post) and assign it another new template.
This receives the ID passed in via the $_GET object, and then you run wp_delete_post($id) or wp_trash_post($id) (depending on whether or not you’d like to permanently delete it) and that’s about it!
You’d obviously code various checks in place, in order to prevent accidental deletions (etc.).
Cheers,
Lloyd
Sweet…
Thank you SO much, Lloyd!
Totally think a post on your site would be valuable. This info, which I also shared in WPMUDev, received a lot of interest, and your “make it better” tip would be awesome.
Just post a link to your post here when you’re ready. 🙂
Cheers back,
ea/
Hey guys,
I have the same need, do you know how can a user can edit/delete their own post(s)?
Thanks
Hi Erin,
great tutorial. I have everything working for the post creation. Now I am looking for a way that the user can edit/delete their own post(s), once they are logged in.
Do you have any idea, if there are viable alternatives to the plugins “Gravity Forms – Update Post” and “Gravity Forms: Update Post”?
Cheers,
Alex
Thanks Alex. I’m glad to hear the steps were clear enough for you to replicate it with success on your site. 🙂
You ask a good question. Unfortunately, I haven’t explored that far into it, but now I, too, want to know the answer. If — when! — I find something that works well enough to write about it here, would you like me to ping you to let you know I’ve got something worth trying?
ea/